Email
Bize sorun

E-posta gönderin

[wpml_language_selector_widget]
[wpml_language_selector_widget]

Azure Blob Storage Lifecycle Management

Bu yazımızda Azure Storage kullanımında hem maliyet optimizasyonu hem storage yönetimi anlamında kolaylık sağlayan servisten bahsetmek istiyorum. Umarım sizin için faydalı olur.

Azure Blob Storage Lifecycle Management Nedir?

Lifecycle Management, Storage içerisindeki dosyalarınıza nadiren veya hiç erişmeyebilirsiniz. Bu dosyaları erişim sıklıklarına göre kural bazlı tanımlama yaparak Erişim Katmanının (Access Tier) değiştirilmesini sağlıyor. Bu servisi kullanabilmeniz için depolama hesap türünün StorageV2(general purposeV2) olması gerekiyor. Mevcutta kullandığınız depolama hesap türü farklı ise Upgrade yapmanız gerekiyor.

Erişim Katmanları (Access Tier) tanımını şu şekilde yapabiliriz.

Hot: Sürekli erişilen dosyalar için kullanılmaktadır. Depolama maliyeti yüksek, erişim maliyeti düşüktür.

Cool: Nadiren erişim sağlanan dosyalar için kullanılmaktadır. Depolama maliye düşük, erişim maliyeti yüksektir.

Archive: Neredeyse hiç erişim sağlanmayan dosyalar için kullanılmaktadır. Depolama maliyeti en düşüktür. Erişim sağlanmak istenirse eğer maliyet yükselecektir.

Depolama Hesap Türü (Storage Account Kind) Nasıl Upgrade Yapılır?
A screenshot of a social media post

Description automatically generated

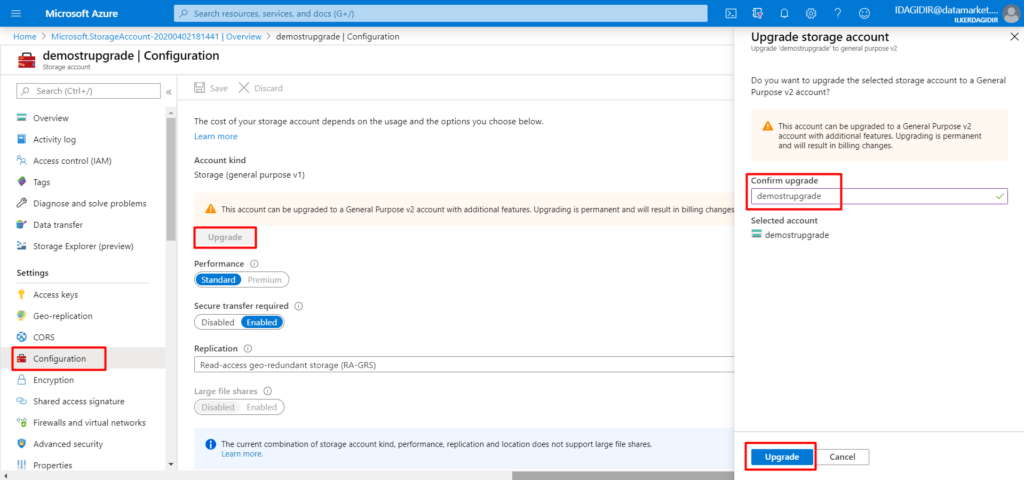
Burada Storage Account> Configuration> Upgrade kısmında Upgrade yapılacak olan Storage’ın ismini girerek Upgrade diyoruz. Birkaç saniye içerisinde Upgrade işlemi gerçekleşmiş oluyor.

Lifecycle Management yapılandırması ise şu şekildedir.

Mevcutta kullanılan Depolama Hesabı (Storage Account) içerisinden ilerliyoruz.
A screenshot of a cell phone

Description automatically generated

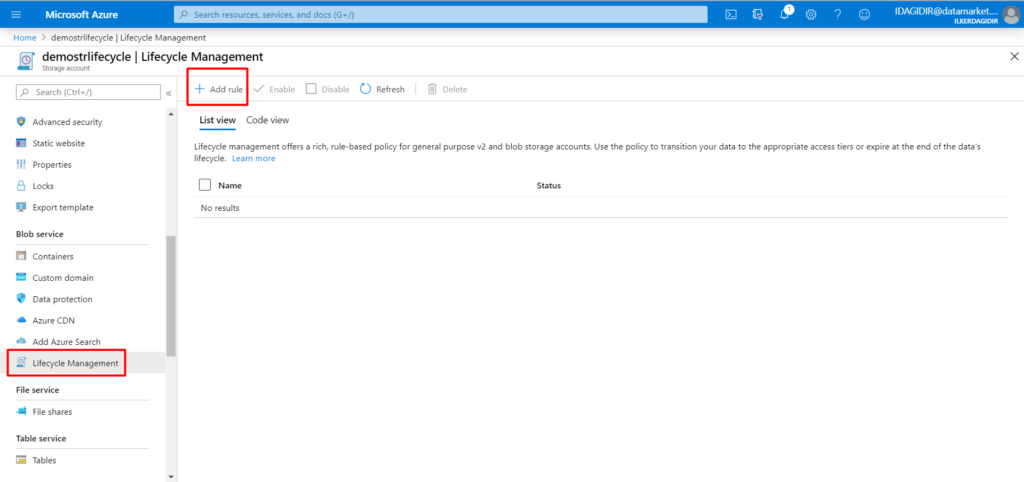
Storage’ınızın Blob Service başlığı altında bulunan Lifecycle Management’a girerek yeni bir kural oluşturabilmemiz için Add rule diyoruz.

A screenshot of a cell phone

Description automatically generated

Kural ekle tarafında yapılacakları adım adım listeliyorum.

  1. Eklenecek kural için isim belirlememiz gerekiyor.
  2. 20 gün boyunca herhangi bir değişiklik veya erişim olmadıysa Cool olarak değiştir.
  3. 40 gün boyunca herhangi bir değişiklik veya erişim olmadıysa Archive olarak değiştir.
  4. Eğer 200 gün boyunca belirlenen dosyalarda bir değişiklik veya erişim olmadıysa silinir.
  5. Blob içerisinde oluşturulan Snapshot’ların kaç gün sonra silineceğini belirliyoruz.
  6. Kuralları tanımladık sonra filtreleme kısmına geçebiliriz.
A screenshot of a cell phone

Description automatically generated
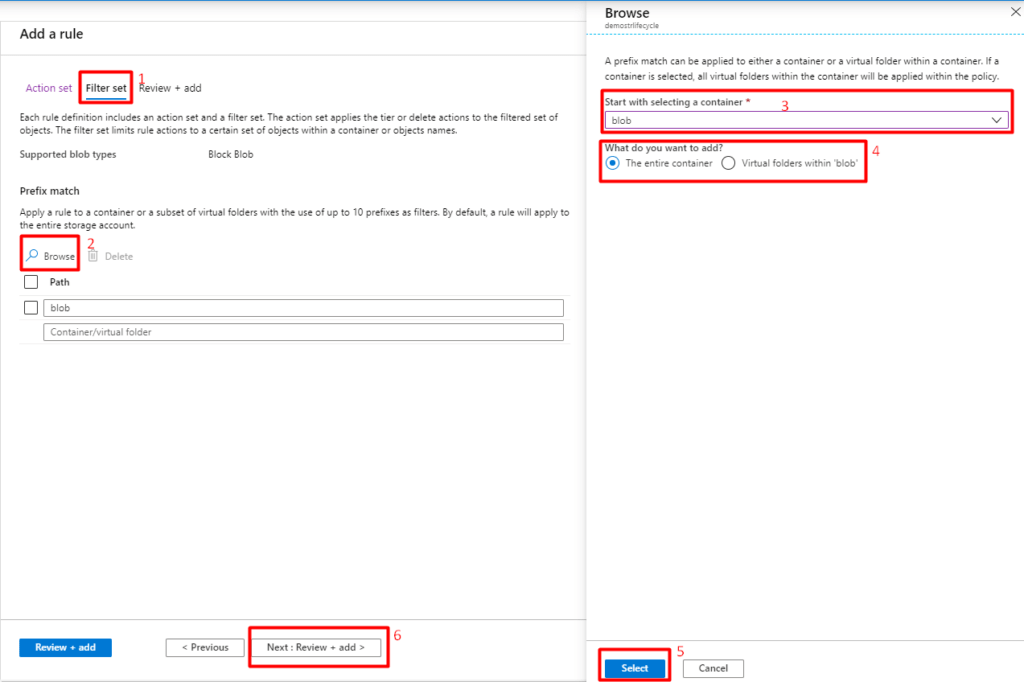
  1. Storage içerisindeki dosyaların hangilerine bu kuralların etki edeceğini belirleyeceğimiz kısım.
  2. Eklenecek klasörleri Browse diyerek belirliyoruz. Not: En fazla 10 klasör ekleyebiliyoruz.
  3. Blob Storage içerisinde container ismini belirliyoruz.
  4. Burada tüm container’a uygulayabiliriz veya container içerisinde seçeceğim klasör veya klasörlerinize uygula seçeneği mevcut.
  5. Yapılandırmamız bittiğinde Select diyerek bitiriyoruz.
  6. Bir sonraki adım olan yaptığımız işlemleri artık geçerli olması için Next:Review+Add diyoruz.
A screenshot of a cell phone

Description automatically generated

Yaptığımız değişikliklerin özetini bu ekranda görebiliyoruz. Add diyerek kuralı aktif edilmiş olacaktır.

Oluşturduğumuz kural veya kuralların kod tarafınıda görmemiz mümkün. Ekran görüntüsü aşağıda paylaşıyorum.

A screenshot of a social media post

Description automatically generated

Umarız faydalı bir makale olmuştur.

Referanslar:

https://docs.microsoft.com/en-us/azure/storage/blobs/storage-blob-storage-tiers?tabs=azure-portal

https://docs.microsoft.com/en-us/azure/storage/blobs/storage-lifecycle-management-concepts?tabs=azure-portal

https://docs.microsoft.com/en-us/azure/storage/common/storage-account-upgrade?tabs=azure-portal

Previous Post

App Service Migration Tool

Next Post

Azure İzleme ve Uyarı Servisleri

In this article, I would like to mention the servant who provides convenience in terms of both cost optimization and storage management in the use of Azure Storage. I hope it will be useful to you.

What is Azure Blob Storage Lifecycle Management?

Lifecycle Management, you rarely or never have access to your files in Storage. It enables to change the Access Tier by defining the files based on the frequency of access. Storage account type must be StorageV2 (general purposeV2) to use this service. If your current storage account type is different, you need to upgrade.

We can define Access Tier (Hot, Cool and Archive) as below.

Hot: It is used when there is constant access to files. Storage cost is high and access cost is low.

Cool: It is used for files with less access. Storage cost is low and access cost is high.

Archive: It is used for files with almost no access. Storage cost is the lowest. If access is desired, the cost will increase.

How to Upgrade Storage Account Kind?

We enter the name of Storage to be upgraded in Storage Account > Configuration > Upgrade section and call Upgrade. Upgrade is done in a few seconds.

I share step by step how to set up Lifecycle Management.

We proceed from the current Storage Account.

We call it Add Rule so that we can create a new rule by entering Lifecycle Management under the Blob Service heading of your Storage.

I list below what you can do on the screen that we see.

  1. We need to specify a name for the rule to be added.
  2. Change it to Cool if there are no changes or access for 20 days.
  3. Change it to Archive if there have been no changes or access for 40 days.
  4. If there is no change or access to the files specified for 200 days, it will be deleted.
  5. We determine how many days after the Snapshots created in the blob will be deleted.
  6. After we have defined the rules, we can go to the filtering section.

Note: By default, a rule will apply to the entire storage.

  1. Where we will determine which folders in the container will affect.
  2. We determine the folders to be added by saying Browse. Note: We can add up to 10 folders.
  3. The container in the blob storage is determined.
  4. Here we have the option to apply to the entire container or apply to the folder or folders I will select in the container.
  5. When our configuration is finished, we finish by saying Select.
  6. The next step is to click on Next: Review + Add to make our actions now valid.

We can see a summary of the changes we made on this screen. By saying Add, the rule will be activated.

It is possible to see the code side of the rule or rules we have created. I share the screenshot below.

I hope it was a useful article.

References:

https://docs.microsoft.com/en-us/azure/storage/blobs/storage-blob-storage-tiers?tabs=azure-portal

https://docs.microsoft.com/en-us/azure/storage/blobs/storage-lifecycle-management-concepts?tabs=azure-portal

https://docs.microsoft.com/en-us/azure/storage/common/storage-account-upgrade?tabs=azure-portal

Previous Post

App Service Migration Tool

Next Post

Azure İzleme ve Uyarı Servisleri

YEPYENİ BİR DENEYİM İÇİN

Bizimle İletişime Geçin

Teknoloji sorunları hakkında endişelenmeyi bırakın. Sadece işinize odaklanın. İhtiyacınız olan teknolojiyi sizin için belirleyip, yönetelim.
Start typing to see you are looking for.
Çerez Bilgilendirmesi
Sitemizde kullanımı analiz etmek, içerik ve reklamları kişiselleştirmek, reklam kampanyalarının etkinliğini ölçmek ve ziyaret tercihlerinizi hatırlamak için çerezler kullanmaktayız. Çerezler hakkında detaylı bilgi için buraya tıklayın.
Accept